Well, the weather finally performed as forecast and I got to test the ProQ™ Eco Smoker sent to me by Ian from ProQ™ .
The smoker arrived promptly and safely packaged.
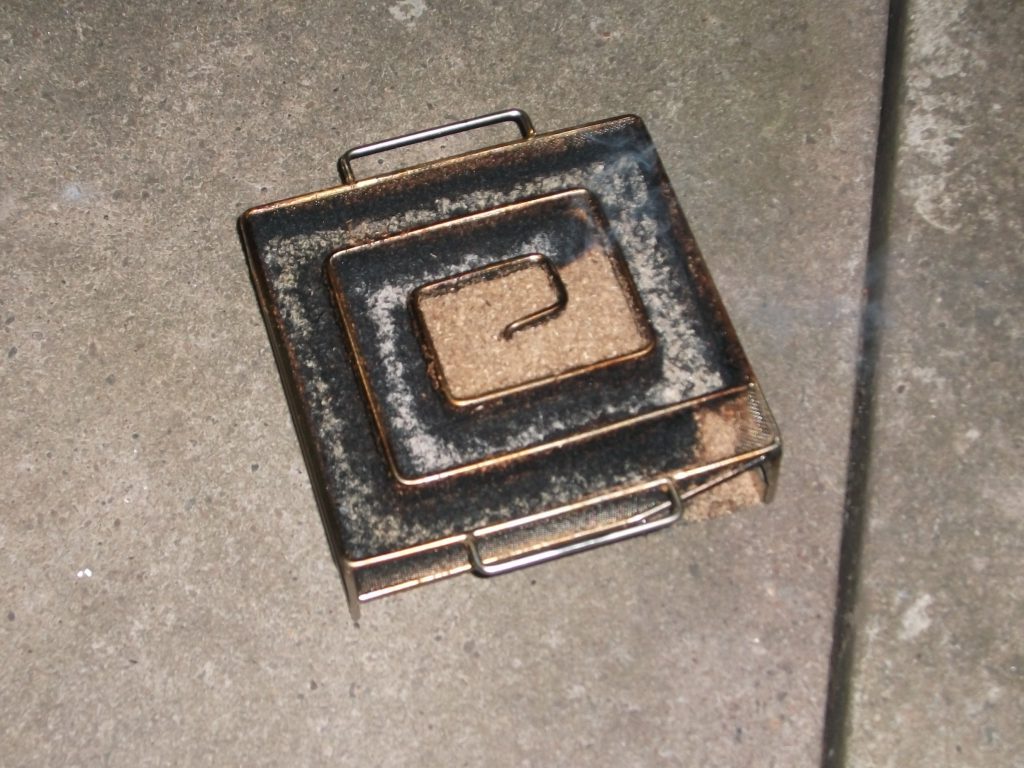
It comprises a cardboard box with a further cardboard liner that strengthens it and forms the shelf supports, three metal wire shelves and two metal drip trays – one with handles.
Assembly is self-explanatory with instructions on the box and a video tutorial online.
The drip tray prevents nasty surprises!
A test batch of cheese and garlic is put into the box.
Fill the smoker with dust ensuring that the dust is not above the internal divides.
Light the smoker using a nightlight.
After a couple of minutes, it will start smoking, remove the night-light and place the smoke generator on the metal tray in the bottom of the box.
The box has a vent in the top to ensure a steady throughput of smoke.
After 8 hours.
This type of smoking uses only a trickle of smoke, this ensures that your food isn’t bitter. You can just see the smoke in this photo, there’s so little your neighbours won’t even know you are smoking food.
After 8 hours the food is taking on some colour.
After 11 hours the smoke generator was still going strong…
…but it’s 2 am and time for bed for me! The smoked food was wrapped well and put into the fridge overnight. The next day the colour has darkened slightly. I like to leave cold smoked food for a couple of days for the flavours to permeate the food.
So how’s it turned out? Well, it’s all as I expected really. The cheese is fine with just the right amount of smokiness. It’s a great way to add value to cheap cheese. It’s unbelievable, the difference between a rubbery Edam – only fit for erasing spelling mistakes, and its smoked counterpart.
At £30+ the generator may look expensive, but considering its ease of use and the length of time it burns – plus its economical use of dust – it pays for itself in no time at all. A couple of sides of smoked salmon will not only recoup your outlay but make you a lot of friends in the process! I guess that it’s only guys who’ve spent hours in the cold and rain tending other methods of producing cold smoke that really appreciate how brilliant this little gizmo is; take it from me it’s superb; you don’t even want to consider an alternative.
As to the Eco-smoker, well the obvious comment would be: “That’s a lot of money for a cardboard box!”. However, I know from experience that finding something suitable for use isn’t as easy as it seems at face value. There’s no doubt that given a suitable undercover space for storage and use, it will last for ages. Yes, undoubtedly you will want something more permanent in the longer term but this well thought out turnkey solution makes a great alternative in the short to medium term.
It will also be great for the hunting/shooting/fishing fraternity who may wish to have a portable smoking solution or anyone with too little space for a more permanent smoker. In my case, it will allow me to cold smoke food at the same time as I am using my purpose-built smoker for hot smoking – an advantage as I make batches of different types of products at once – some for hot smoking and some for cold.
All in all, what a great Christmas present for the foodie in your life.
The Eco-smoker and Cold Smoke Generator are available at various prices from ProQ™ and their stockists.
Update: Soon after I wrote this a friend bought a ProQ smoker and I gave him the Eco smoker box. I know for a fact that he was still using it last year to smoke salmon. That’s over 10 years of use. Amazing.
In 2012, when I wrote this, people were only just starting to realise that smoking meat didn’t need to be the preserve of the expert and that there was an alternative to barbecues that consisted of burnt sausages and dried up burgers.
This post is completely out of date. I leave it here for the sake of posterity:
In a previous post, I said I’d give further details of the options for smoking, grilling and barbecuing food. My health and other factors have delayed this, but here goes…
…Let’s start cold and get hotter!
Cold Smoking
So to cold smoking. What’s that? It’s a method of smoking food at temperatures below 30°C/86°F (approx) so that it is still uncooked. It’s the method that produces smoked salmon that when thinly sliced and nicely presented sells for silly money. The cold process also allows items that would otherwise melt, such as cheese and butter, to be smoked. Surely, I can’t do that? Well here’s news for you: you can. In fact, it’s easy; all you need is one of these cold smoke generators. With this, you can smoke fish, meat, cheese, eggs, even salt, the list’s as big as your imagination. Just find a suitable container: a cardboard box, old fridge, barrel, large bucket etc and you’re away. You can even buy a ready-made cardboard smoker – it may seem expensive and hardly durable but the one I road-tested in 2010 is still being used regularly by a friend of mine.
There are many other methods of cold smoking; I’ve tried many of them. None are as cheap, easy, and produce smoke for as long without intervention as this.
As to the cold smoking process, this normally involves brining, dry salting or curing the meat/fish and then smoking it for anything from 12 hours up to 7 – 10 days for large hams. With items such as fish that are salted rather than cured, it is necessary to achieve a certain weight loss to make the product safer. Further details of the smoking process (for salmon) can be found in my A Tale of Cold Smoked Salmon post or in this advice from the Torry Research Station
(Note: The Cold smoke generator and accessories may be cheaper from a ProQ stockist rather than direct.)
Hot Smoking
There are three main types of hot smoking and with all of them you end up with a fully cooked, ready-to-eat, product. They differ only in the temperature and the length of time for which the food is smoked.
Traditional Hot Smoking
To call it hot smoking is really a bit of a red-herring, it’s not exactly hot. It works at temperatures in a band between 41°C/105°F and 80°C/176°F (although smoke will usually be applied only up to about 60°C/140°F). That’s right at the bottom end of domestic oven temperatures. The reason for using such low temperatures is to allow items such as sausage and luncheon meats to be smoked without the fat in them melting. Think fat around the meat in a tin of corned beef and you’ll see why we want to avoid this.
Cabinet smokers using gas or electricity as a heat source are the easiest to control at these temperatures over the comparatively long time that hot smoking takes.
Regrettably, the UK is way behind the USA in manufacturing smokers specifically for this purpose. The main one seen regularly is the Bradley Smoker, a great machine if you don’t mind the cost of the special wood pellets that it uses. Cabinet smokers are also available from The Garden Gift Shop. I have not seen or used either of these, so you purchase at your own risk. Periodically, this type of smoker appears on eBay, usually from the US or Germany. The postage for US ones is often more than the cost of the smoker!
Many people will choose to make their own hot smoker. Mine is effectively a metal box sat above a gas ring. I made it this way to avoid having the gas supply inside the box with the inherent dangers involved if the flame goes out. If you choose to use gas, please take advice from a qualified gas engineer before doing anything. Electricity appears to be the safest method to use, subject to wiring by a qualified electrician but gas does give a moister atmosphere which is desirable. Either heat source will require a box to contain the food, usually a metal one although quite a number of the US members at the sausagemaking.org forum have made them successfully in wood. If possible, it’s good for the smoke chamber to be insulated to save on energy.
This is my hot smoker/bbq, note that the gas burner is segregated from the smoker by a steel plate and that, apart from supports for the burner, the base of the box has been removed. The smoker is effectively just a big metal box sitting on a burner!
When making sausage or luncheon meat using this type of smoking it is advisable to use curing salts to protect the meat during the long period that it is in the temperature danger zone. A typical smoked sausage would be placed in the smoker at 50°C/122°F for about an hour without smoke until the casings are dry. Smoke is then applied as the temperature is raised to 75°C/167°F over a period of 3 – 4 hours. The product is then cooked at 75°C – 80°C/167°F – 180°F (Temperatures as high as 90°C/194°F are acceptable, but only for a short period of time). It’s cooked until it reaches an internal temperature of 67°C/153°F and then held at this temperature for 10 minutes. Alternatively, it can be cooked to an alternative safe temperature. The sausage is then cooled as quickly as possible using a water spray/bath and subsequently refrigerated.
Barbecue (BBQ)
In my previous post I explained that there is a difference between what we know as BBQ and what the Americans know as BBQ. In this section, when I talk of BBQ I’m referring to US style BBQ – long and slow cooking with smoke for some of the time. For this we need a covered BBQ that is capable of holding quite a low temperature for a long period of time – may be up to 20 hours – even a chicken will take 4 – 6 hours to cook. Here we’re looking at temperatures higher than hot smoking, but still right at the lower end of those in a domestic oven. Between 90°C/194°F and 150°C/300°F, with most of the cooking taking place between 105°C/221°F and 125°C/257°F. We’ve already looked at cabinet smokers, these are fine at holding these temperatures but many BBQers frown on the use of anything other than wood and charcoal. A number of companies make BBQ’s that maintain these low temperatures over long periods of time. Needless to say, they are far more readily available in the US where hobbyists will spend $1000’s on their ‘BBQ pit’. Have a look here and you’ll see what I mean.
There are two main types available, bullet and offset – you can see both types here. In the UK you’ll find products (In rough order of lowest cost) from Brinkman, Pro Q, Weber, and a number of others.
An option is to make your own. The cheapest and easiest to make is called a UDS (Upright or Ugly Drum Smoker – depending on your point of view!). There are details of how to build one on The Smoke Ring forum.
In this style of BBQ the meat is sometimes brined usually a dry rub is applied and then it is cooked very slowly, with or without, smoke. It produces succulent meat and is usually served with a bbq sauce – whole shoulder joints of pork, whole chicken, briskets, all those cheaper cuts that would be like leather cooked at high temperature are fantastic cooked like this. Side dishes such as bbq beans will be cooked at the same time.
I’m a novice in this type of cooking so for further information please see the fantastic US website amazingribs.com where every aspect is covered.
Tabletop/Biscuit tin Smokers
Now anyone can do this! Imagine the scenario, you’ve been given a trout by a local fisherman who has kindly filleted it for you (Yeah, I bet!). You’d like it smoked but don’t have any fancy equipment, but you have got some BBQ wood dust/chips. Easy, just line your wok with a double layer of ‘tinfoil’ put some wood chips on it, create a stand for the fish to sit on – a round cake rack or a couple of chop-sticks with a plate balanced on them – put the fish on it, stuff the lid on and put it on the heat. Open every door and window and try and get rid of the smell for a week ‘cos a little bit of smoke goes a long way! It’s OK for TV chefs to do; they don’t have to live with the smell and the mess afterwards!
So what are the options?
There are any number of commercially available stovetop smokers, probably the best known and most widely available is from Camerons; there are many others of a similar design. Some include a spirit burner, others don’t. To be honest, it’s so simple to make your own with a biscuit or sweet tin or even a couple of roasting tins that spending £50 on one seems wasteful. You could, of course, use the wok method described earlier – but maybe it’s best done outside! It’s cheap and simple and produces great food. Go on, what’s stopping you?
Typically, fish is the chosen food for these types of smokers, but that’s not to say that other things can’t be used. A quick brine/salt certainly helps and then it’s smoked with a handful of wood dust/chips. About 20 – 30 minutes is usually enough to cook thin fillets.
Grilling (UK – Barbecue)
Basically, cooking food on a (usually) uncovered barbecue. At its best superb: at its worst, you get someone who cooks once a year trying to prove that food is carbon-based by turning it into charcoal! If you’re in the former category, invite me around. Joking aside, you don’t need me to tell you what’s available out there to cook on – there’s equipment to suit every price range.
Resources and Reference
Torry Research Institute Publications: Hot Smoking of Fish Kippers Smoked Trout Smoked Mussels and Whelks Smoked White Fish Smoked cod roes Smoked saithe/coley Botulism and Fishery Products
A friend brought me some samosas from a shop on Green Lane Road, Leicester to try and they are superb. Mind you, the tamarind dip which accompanied them about blew my brains out!
I’ve made my own samosas in the past using a combination of recipes from Madhur Jaffrey and Pat Chapman of the Curry Club. I’ve been pleased with the results and far prefer the homemade pastry to that on many of the bought ones. They take time though as rolling the pastry and making cone shapes and then filling them is a bit fiddly.
It’s best to make the filling well in advance to give it time to go completely cold.
Ingredients For filling: 1½ lb boiled potatoes A good handful of frozen peas – cooked 1 small onion finely chopped 1 or 2 (or more) small green chillis finely chopped 1 tablespoon grated ginger 1 heaped teaspoon ground coriander 1 heaped teaspoon ground roasted cumin seeds 1 heaped teaspoon garam masala chilli powder to taste 1½ teaspoon salt 2 tablespoons lemon juice
For Pastry: 12 oz plain flour ¾ teaspoon salt 5 tablespoons cooking oil 5 tablespoons (approx) water
Filling: Fry the onion until soft in about 3 tablespoons of cooking oil, chop the peas up a bit and add them along with the rest of the ingredients except the lemon juice. Mash the potatoes up a bit in the pan and mix everything together well – add a touch of water if it seems too dry, but only a couple of tablespoons or so. Cook for about 5 minutes.
Add the lemon juice and adjust the seasoning to taste with salt and/or lemon juice.
Pastry: Mix flour and salt, rub in the oil and then add enough water and mix to a stiff dough. Knead for about 10 minutes. Mould into a ball and rub with a tiny amount of oil, wrap and put aside in a cool place.
Assembly: Make a loose paste of about 1 tablespoon of flour with water – this is used to seal the pastry. Divide the pastry into 8 pieces and roll out each very thinly into a 7 – 8 inch circle. Cut a circle using a 7-inch plate/pie tin as a template and then cut each circle in half.
Form cones from each semi-circle of pastry overlapping the edges by about ½ inch at the top and sealing them well using either a drop of water or a small amount of the paste made earlier.
Fill the cones with about 2½ teaspoons of the filling mix. Seal the tops well using the water/paste and crimp if you want to.
Deep fry slowly at about 170°C turning them frequently until nicely brown. Drain, leave to cool a bit, then enjoy on their own or with a dipping sauce of your choice!
I always intend to prepare for Christmas in plenty of time, but it never seems to happen! One thing I do like to make is my own sausage rolls. There is no comparison between a homemade sausage roll, made with good (home-made) sausage meat and the awful frozen sludge-filled offerings at the supermarket. Uncooked commercially produced sausage rolls only need to have a 6% meat content!
For sausage rolls I make a quick rough puff pastry:
Ingredients 250gm Plain Flour Pinch of Salt 125gm Butter 125gm Lard or Vegetarian Fat 135gm Cold Water A small squeeze of Lemon Juice
Method
Put the flour and salt in a food processor.
Cut butter into 4 pieces, put 3 on a plate and 1 in the flour. Do the same with the Lard.
Soften the butter on the plate in a microwave using the defrost setting. Do the same with the Lard.
Add the water and lemon to the food processor and mix to a dough.
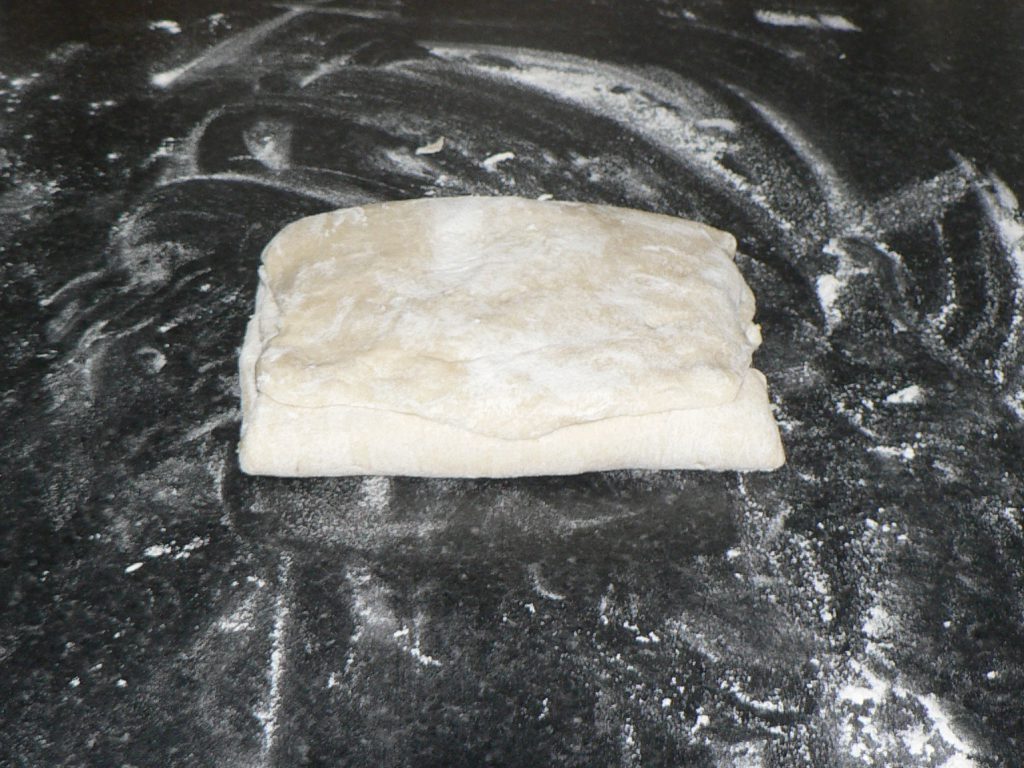
Roll the dough out on a floured board into a rectangle about 3 times as long as it is wide (see photo)
Spread the top two-thirds of the rectangle with one portion of both the butter and lard – just like buttering bread.
Fold the un-buttered bottom third up.
And then the top third down.
Turn the pastry ¼ turn.
Roll the dough back out to the size it was originally and repeat the above twice with the other two portions of lard and butter. Then, repeat it one more time without adding any fat. You’ll end up with something like this:
I’m freezing this for later use as I need to make some more sausage meat. Had I have been organised, I would have had the fresh sausage meat ready so I could have frozen the completed sausage rolls ready for cooking.
Now I know if I call this recipe a Chelsea Bun, someone will come along and say, “Oh, no it’s not, a Chelsea bun is made with currants, lemon zest, or whatever and glazed with the milk of a particular species of Yak, only found on one lost island in Battersea Park!” Hence the ‘ish’ in the title!
I made these a couple of weeks ago from a recipe in Prue Leith and Caroline Waldegrave’s Cookery Bible but wasn’t 100% happy with them. Here’s my take on the recipe, it still needs fine tweaking. I think that it probably needs more liquid.
Filling 55gm butter 55gm sugar – plus a bit for tops 80gm raisins – soaked in tea or booze until plump 80gm sultanas – soaked in tea or booze until plump
To finish Apricot or another glaze.
Method Put the fruit to soak in sweet cold black tea, or any other fine beverage of choice – brandy would be good.
Melt the butter for the dough (only just get it really soft – not frying temperature). Put all the dough ingredients in a food mixer bowl and, using the dough hook, kneed for 10 minutes – it’ll probably be very sticky!.
Shape into a ball on a well-floured surface, return to the bowl, cover, and leave to rise until doubled in size.
Mix (cream) the butter and sugar for the filling together. I may add some cinnamon to it next time.
When the dough has risen, roll it out to a rectangle about 12″ (30cm) wide by as long as you can get it, maybe 16″ (40cm) if you’re lucky.
Spread the dough with the butter/sugar mix and spread the (well drained) fruit in a layer over it leaving the last ½” (1cm) uncovered. Roll the dough up into a ‘swiss roll’ and cut into 12-16 slices.
Put oven to heat on 180°C (350°F).
Place the coils of dough, laid flat, about ¼”-½” (about 10mm) apart in a roasting tin. Leave to rise until doubled in size and all pushing against each other.
Sprinkle with sugar and cook for about 20-25 minutes (the time will vary depending on the oven). Check after 10 minutes and, if they are going very brown, cover loosely with foil.
Cool and glaze with apricot glaze or any other glaze of your choice.
Enjoy!
I fancy varying the recipe next time and using chocolate chips and pieces of pear instead of the dried fruit.
There you go, I’m being posh and calling it quiche! It’s really a good old bacon and cheese flan. It’s a pity that so many poor imitations of this superb rich savoury egg custard are sold by supermarkets and presented to the world on numerous buffets with cheap frozen sausage rolls and those damn miniature scotch eggs.
A good quiche is all about the quality of the ingredients, there’s few of them, so they all count. Use good dry-cured bacon (mild smoked if you like), good eggs, double cream not milk, and you won’t go far wrong. One other thing, and a very important one, is that most recipes (including Delia) will tell you to cook the quiche at too high a temperature. I’ve said this before, but I’ll say it again – cook the quiche at around 160°C or below; you’re making a savoury custard, not an omelette!
I was fortunate to receive Jane Grigson’s book “Charcuterie and French Pork Cookery”, for my birthday a week or so ago. You see, it’s not just me:
Bake in a moderate oven for about 40 minutes. Remember that a quiche is a savoury custard tart; it mustn’t cook too quickly or it will curdle.
I feel a bit of a fraud giving a recipe; it’s not rocket science, but here’s my take on it:
Pastry
6oz Plain Flour 3oz lard (or lard/butter mix) about ¼ teasp salt water
Rub the fat into the flour/salt until it resembles breadcrumbs, then add water a little at a time and mix until it forms a dough. In all honesty, I generally make a batch using 1lb flour, 8oz fat and 1 teaspoon of salt, in the food processor. Don’t add too much liquid or the pastry will be hard – about 1½ – 2 tablespoons (ish) should be about right for 6oz flour.
Use the pastry to line a loose-bottomed flan tin (approx. 7½ inch diameter) then prick the base with a fork, line it with parchment paper, fill with baking beans, or rice or dried beans, and bake it at 180°C for 15 minutes. Remove the beans and parchment and bake it for a further 5 minutes. Reduce the oven temperature to 160°C ready for the next stage.
Filling
6 – 8oz bacon 2 – 3oz grated cheese ¾ pint double cream 3 eggs Salt and pepper
While the pastry is cooking, remove the rind from the bacon and discard it. Cut the bacon into small pieces and fry it, then put it on a paper towel to drain and cool. Mix the eggs and cream and season. Sprinkle the bacon over the base of the pastry followed by the cheese and then fill with the egg/cream mix. I do this while the pastry case is still on the oven shelf to avoid spillage. Bake it at 160°C for 40 minutes or so until it’s set.
It can be eaten warm but according to my wife is better eaten at room temperature the following day.
One of my old standbys – based on a recipe from Nigel Slater’s book ‘Toast’. A book well worth buying.
The recipe is simplicity itself.
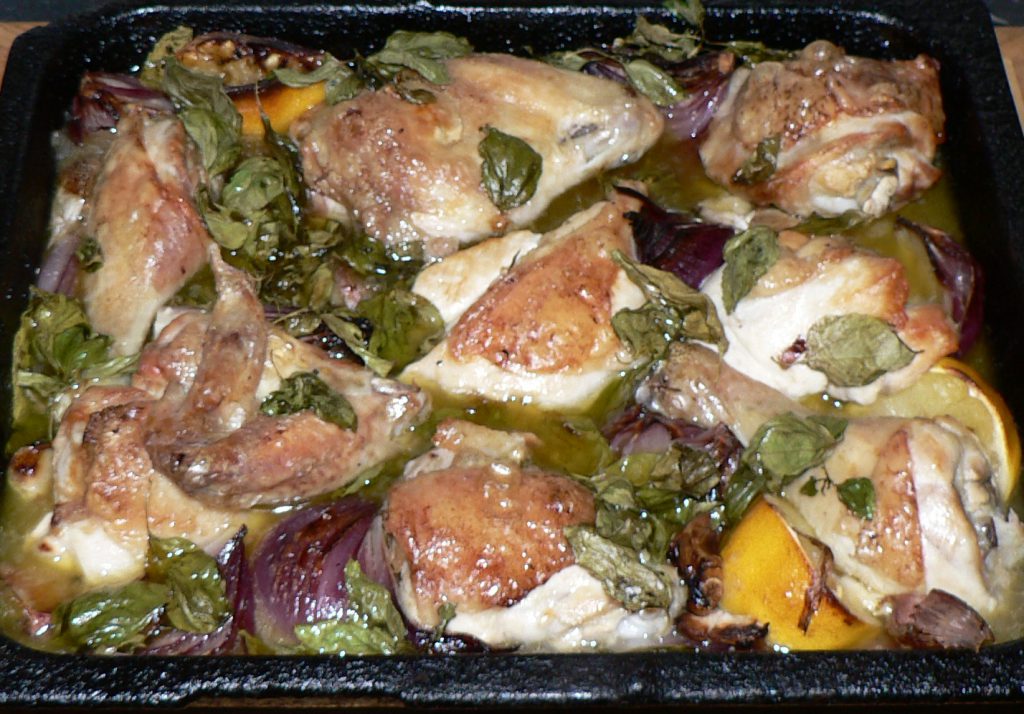
Chicken with Lemon, Basil and Garlic
Cut a chicken into 8 pieces. Put it into a roasting tin with a head of garlic (crushed up a bit) and some onion segments. Squeeze over the juice from two lemons and chuck the lemons in. Glug with olive oil and stuff in the oven at 180°C for ½ hour. Then chuck a glass of white wine in along with a handful of basil leaves. Cook for 15 minutes more and serve…
…dip ya bread in!
This is even nicer done with preserved lemons.
Pauline can’t have wine, so I used chicken stock instead. She’s going to have to go!
This time of year is great for picking up double cream that’s near its sell-by date from the Supermarket. Just after Easter or Wimbledon are also good times.
I make butter using my Kenwood mixer, you could also use an electric whisk, or even make it by hand.
I put the cream in the mixer with a pinch of salt and a small pinch of sugar for every 300ml. I’ve no idea why I use the sugar; it’s just that I saw a lady who had made the butter for Chatsworth house for about 50 years do it. Who am I to argue with her experience?
Using the K beater on the mixer, start ‘churning’ the cream
Nearly there!
If you don’t have a bowl cover use a tea towel, or when it ‘turns’ it will splatter everywhere:
Turn it off quickly when you hear the butter slopping around in the butter milk.
Now the important bit, rinse and work the butter in very cold water to get rid of as much of the milky stuff in the butter as you can, then put it onto a board and pat (beat) it – water will come out of it. I don’t have butter pats so use my hands and a rolling pin.
I flatten it, then roll it like a Swiss roll to shape it.
You can see from the photo that it needs more work to extract water – I’m going to be using it quickly so it’s not so important. This butter will freeze well, so there’s no excuse for not making plenty.
The taste reminds me of the creamy Normandy butter you get in France. It’s far better than shop-bought and for about half the price. You also get the buttermilk, which makes great scones or can be used to dip chicken into before coating in breadcrumbs or flour when making fried chicken.
I originally posted this recipe in December 2007 but it proved so popular at a recent buffet that I make no apologies for re-posting it here.
This cake is great! It’s really easy to make and more or less foolproof. It also feeds a fair number, as it is very rich.
Ingredients
3½oz (85g) 70% chocolate (broken up) 12oz (350g) butter (in small chunks) 2oz (60g) cocoa (sieved) 3floz (90ml) boiling water (approx.) 14oz (400g) sugar 3 large eggs 7oz (200g) plain flour
Method
1. Melt butter and chocolate, in a bowl over simmering water. 2. Make a paste of the boiling water and cocoa. Remove the bowl from the water, pour the cocoa mix over the chocolate/butter and mix with an electric mixer. 3. Add the sugar, mix, and then mix in the eggs, one at a time. 4. Add the flour, mix, and then beat it on high speed for 1 minute. 5. Bake at 180C in a buttered and floured 9-inch springform tin, lined on the bottom with parchment. 6. Check after about 30–35 mins. A big crack or two will appear when it is cooked but the cake will still wobble when shaken. Depending on the oven, this may take longer.
To finish
7. Allow to cool for 20 mins – remove from springform (do not turn upside down though until cold as it may leak). 8. Leave until cold before use. The cake should ‘ooze’ chocolate when cut.
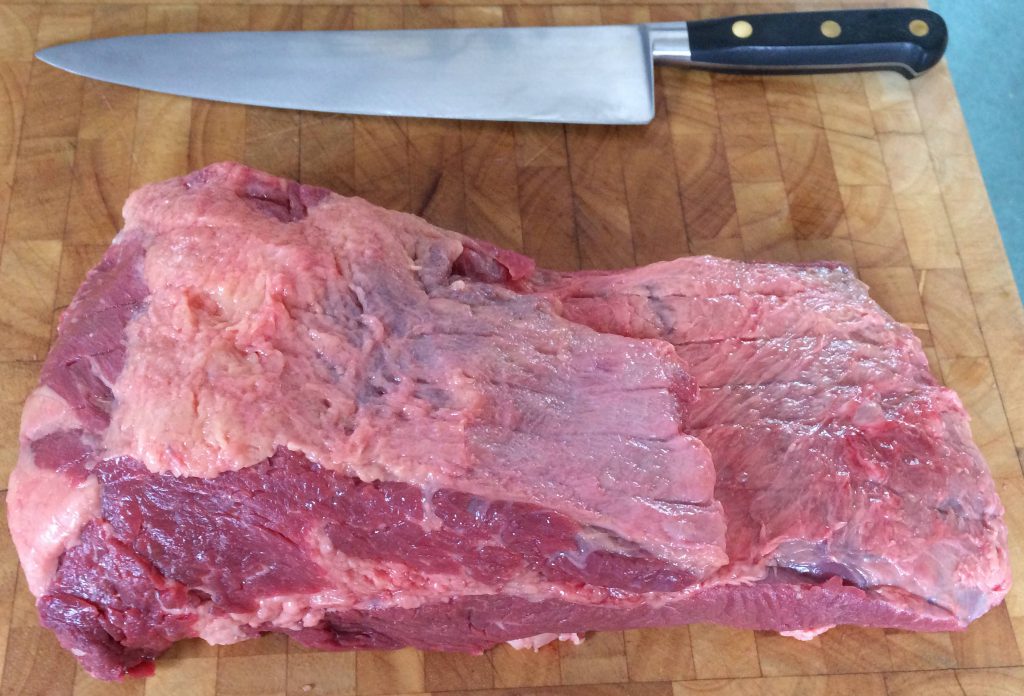
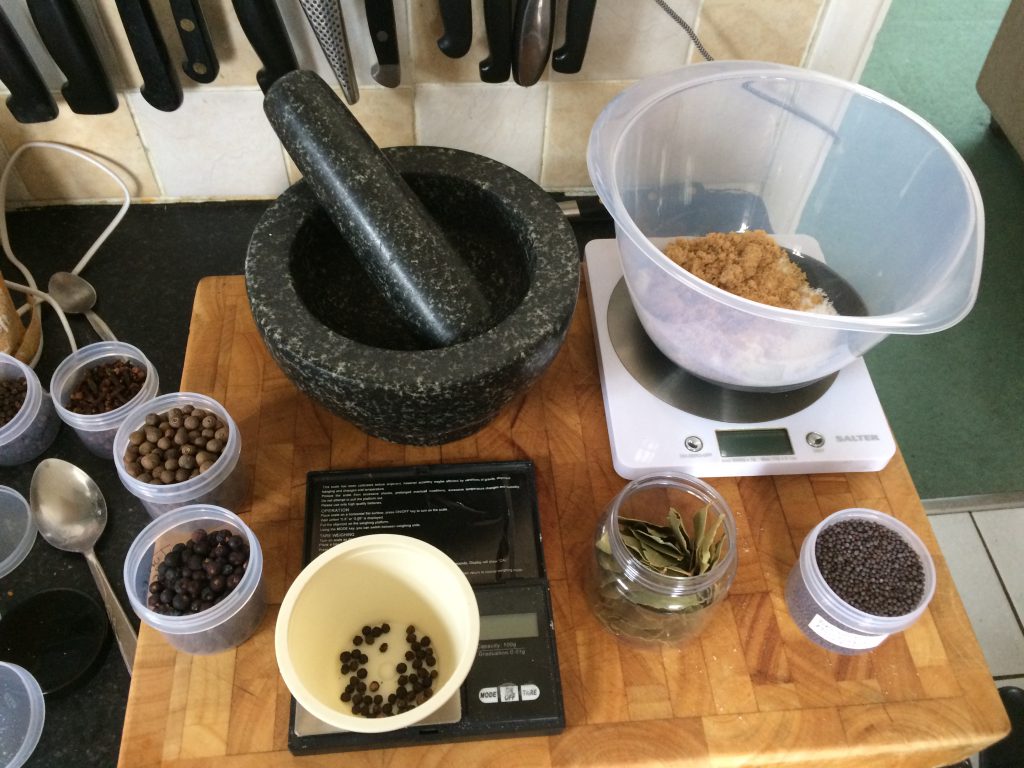
My good friend Paul from North Carolina revised an injection cure to use as a dry-cure for beef brisket. He cooked it to eat on St. Patrick’s day in 2020. I thought of it the other day when we were shopping at a local trade wholesaler as they had brisket on offer. It seemed an ideal time to try something like Paul made without risking expensive meat.
I decided to stick close to Paul’s recipe – I trust him in these things. However, I’ve reduced the allspice and increased the juniper to take account of our preferences.
I trimmed the meat.
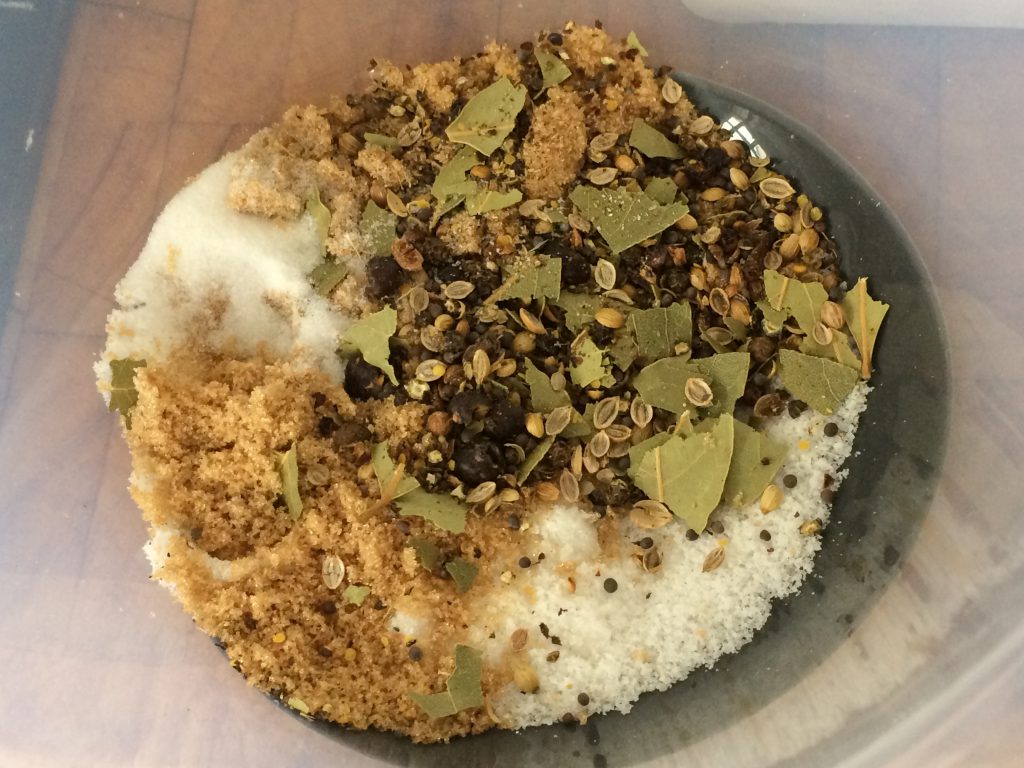
Then prepared the cure.
It looks and smells good.
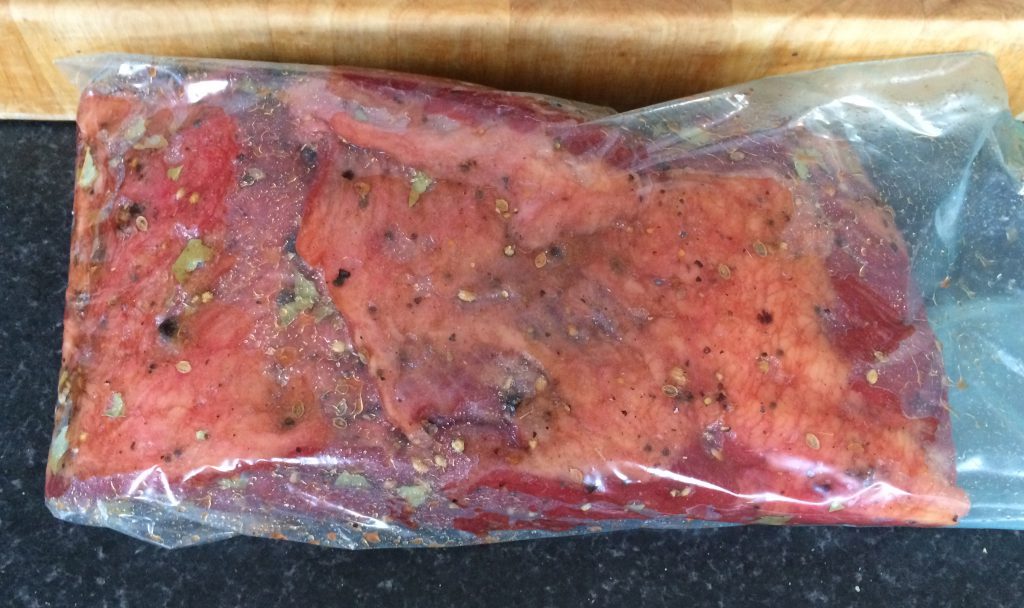
I put the meat into a bag for curing before I rubbed the cure onto it. It’s less messy that way.
The meat will now cure for 20 days or so in the fridge. I’ll leave it for that long because saltpetre needs time to react with bacteria in the meat to do its job.
The results and cooking instructions are in this post.